Installing Pigeon Guards: A Step-by-Step Guide for Solar Panel Owners
As solar panels become an increasingly popular choice for homeowners looking to harness renewable energy, they also attract some unwanted attention from pigeons and other birds. While solar panels offer numerous benefits, they can also become a cozy nesting spot for birds, causing potential damage and hindering the efficiency of your solar system. To mitigate these issues, installing pigeon guards is a practical and effective solution. In this step-by-step guide, we’ll walk you through the process of installing pigeon guards to protect your solar panels.
Step 1: Gather Your Materials
Before you begin, make sure you have all the necessary materials on hand. Here’s what you’ll need:
- Pigeon guards (also known as bird deterrents or bird spikes)
- Cleaning supplies (such as a brush, mild detergent, and water)
- Safety equipment (gloves, goggles, and a ladder)
- Adhesive or fasteners (depending on the type of pigeon guards you choose)
- Optional: wire mesh or netting for additional protection
Step 2: Clean the Area
Start by cleaning the area around your solar panels. Remove any debris, dirt, or bird droppings that may have accumulated. This will ensure a clean surface for attaching the pigeon guards and help them adhere properly.
Step 3: Measure and Plan
Carefully measure the dimensions of your solar panels and the surrounding area where you intend to install the pigeon guards. Plan out the placement to ensure full coverage and maximum protection against birds. Take into account any obstructions or access points where birds may try to perch or nest.
Step 4: Choose the Right Pigeon Guards
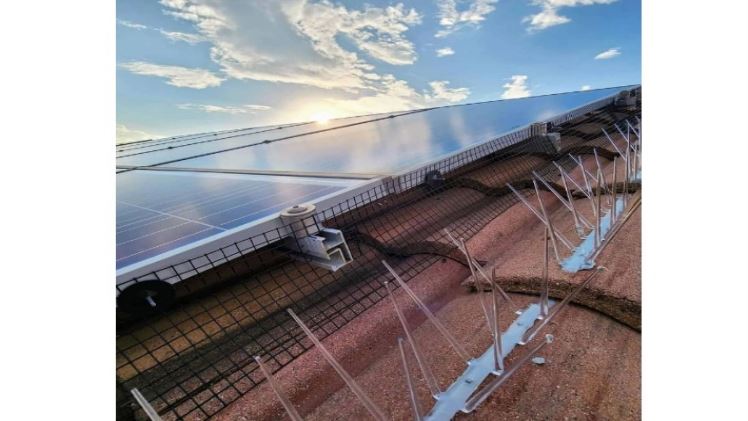
There are various types of pigeon guards available, including spikes, wires, and nets. Consider factors such as the size of the birds in your area, the aesthetics of your solar panel setup, and your budget when choosing the appropriate pigeon guards. Spikes and wires are typically more discreet, while nets provide broader coverage.
Step 5: Install the Pigeon Guards
Depending on the type of pigeon guards you’ve selected, the installation process may vary slightly. Here’s a general overview:
- For adhesive-backed pigeon guards: Clean the surface thoroughly and allow it to dry completely. Apply the adhesive to the base of the pigeon guards and press firmly onto the surface, ensuring a secure bond.
- For screw-on pigeon guards: Use a drill to create pilot holes in the appropriate locations. Align the pigeon guards over the holes and fasten them securely using screws or bolts.
- For wire or netting: Attach the wire or netting to the edges of the solar panels using clips, zip ties, or other fasteners. Make sure the wire or netting is taut and covers the entire perimeter of the panels.
Step 6: Inspect and Maintain
Once the pigeon guards are installed, inspect them regularly to ensure they remain intact and effective. Clean the guards periodically to remove any debris or bird droppings that may accumulate. Additionally, trim any nearby branches or foliage that could provide access for birds.
By following these steps, you can effectively protect your solar panels from pigeons and other birds, ensuring they continue to operate efficiently for years to come. Investing in pigeon guards not only safeguards your solar investment but also promotes a cleaner and more sustainable energy future.
This post was written by a professional at Affordable Cleaning Pros. Affordable Cleaning Pros provides professional solar panel cleaning Fontana CA to ensure they are producing at peak capacity maximizing your investment in clean and renewable energy. If you have pigeons under your panels, Affordable Cleaning Pros can help! Affordable Cleaning Pros offers solar panel cleaning near you, cleaning the top and underneath, installing critter guard to pigeon proof your solar panels, and making sure that the pigeons don’t come back. With their guaranteed solar panel bird proofing near you, Affordable Cleaning Pros industry leading warranty, and free annual inspection, your pigeon problems are solved!